PULSAR TELOS LRF XQ35 Manual
Download manualSpecifications
| Model | LRF XQ35 |
| SKU | 77512 |
| Microbolometer | |
| Type | uncooled |
| Resolution, Pixels | 384×288 |
| Pixel Pitch, µm | 17 |
| NETD, mK | < 25 |
| Frame Rate, Hz | 50 |
| Optical Characteristics | |
| Optical Magnification, x | 3 |
| Smooth Digital Zoom | 3 – 12 |
| Digital Zoom, x | x1 – x4 |
| Lens Focus, mm | 35 |
| Relative Aperture, D/f’ | 1.0 |
| Minimum Focus Distance, m/y | 5 / 5.5 |
| Exit Pupil Diameter, mm/inch | 4 / 0.16 |
| Angular Field of View (Horizontal x Vertical), degree | 10.7×8.0 |
| Linear Field of View, m at 100 m | 18.7 |
| Eyepiece Focus Range, Dioptre | +4 / -5 |
| Detection Distance for Deer-Sized Objects, m/y | 1300 / 1422 |
| Display | |
| Type | AMOLED |
| Resolution, Pixels | 1024×768 |
| Operational Characteristics | |
| Power Supply, V | 3 – 4.2 |
| Battery Type/Capacity/Nominal Output Voltage | LPS7i Li-ion Battery Pack / 6400 mAh / DC 3.7 V |
| External Power Supply | 5 V, 9 V (USB Type-C) |
| Battery Run Time at t=22°C, hours* | 8.5 |
| Degree of Protection, IP Code (IEC60529) | IPX7 |
| Operating Temperature Range, °C / °F | -25 … +40 / -13 – +104 |
| Dimensions, mm/inch | 224x66x87 / 8.82×2.6×3.4 |
| Weight (with battery), kg/oz | 0.63 / 35.3 |
| Video Recorder | |
| Photo/Video Resolution, Pixels | 1024×768 |
| Video/Photo Format | .mp4 / .jpg |
| Built-in Memory | 64 GB |
| Wi-Fi Channel** | |
| Frequency | 2.4/5 GHz |
| Standard | IEEE 802.11 b/g/n/ac |
| Characteristics of the Rangefinder | |
| Wavelength, nm | 905 |
| Measurement Range, m/y*** | 1000/1094 |
| Measurement Accuracy, m | 1 |
* Actual operating time depends on the extent of using Wi-Fi, integrated video recorder and integrated laser rangefinder.
** Reception range may vary depending on various factors: obstacles, other Wi-Fi networks.
*** Depends on the characteristics of the object under observation and environmental conditions.
About the device
Description
Telos LRF thermal imaging monoculars are designed for use both at night-time and during the day and provide exceptional image quality even in adverse weather conditions (fog, smog, rain) and beyond obstacles like branches, tall grass, dense foliage, etc. known to hinder target detection.
Unlike night-vision devices based on electron-optical converters, thermal imaging devices do not need an external light source and are resistant to bright light.
Telos LRF thermal imagers are designed for various applications including hunting, observation, security, terrain orientation, search and rescue operations, etc.
Telos LRF thermal imagers are equipped with a built-in laser rangefinder with a range of up to 1000 m and a measurement accuracy of ± 1 m.
Package contents
- Telos LRF thermal imager
- LPS7i battery pack with protective cover
- Spare battery compartment cover
- Power adapter
- USB Type-C cable with USB Type-A adapter
- Case
- Hand strap
- Quick start guide
- Lens cloth
- Warranty card
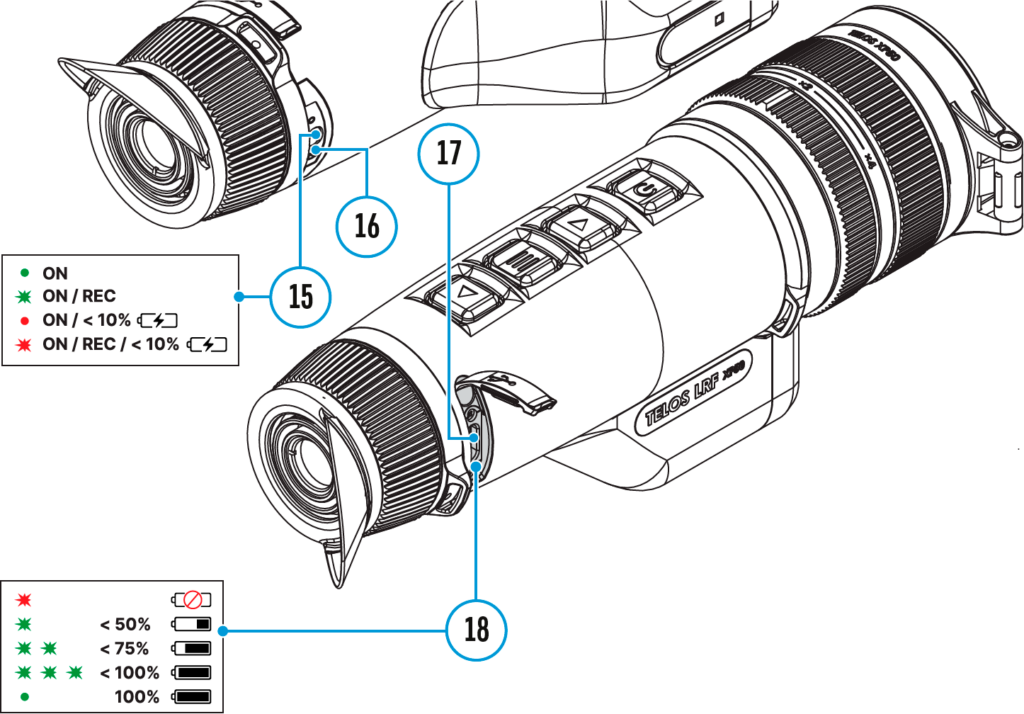
Components and controls
- Lens cover
- Laser rangefinder
- Lens focus ring
- Digital zoom adjustment ring
- Battery compartment
- LPS7i battery
- Battery compartment cover
- Battery protective cover
- ON/OFF/Calibration button
- UP/REC button
- MENU button
- DOWN/LRF button
- Eyepiece diopter adjustment ring
- Tripod adapter (available separately)
- Operation status LED indication
- Microphone
- USB Type-C connector
- LED indication of battery charge in the device
LED indicator (15) displays the current status of the device:
| LED Indicator | Operating Mode |
| Device is turned on | |
| The device is turned on/video recording | |
| The device is turned on/battery charge < 10% | |
| The device is turned on/video recording/battery charge < 10% |
Features
- Functional and ergonomic design
- 8-colour display palette
- 3 calibration modes: Manual, Semi-Automatic, Automatic
- Detection range up to 1800 m/1969 yds
- Smooth digital zoom 2.5-10x
- Three levels of sensitivity enhancement: Normal, High, Ultra
- Integrated laser rangefinder
- Display-Off function
- Defective pixel repair
- Updatable firmware
- Wide operating temperature range (-25°С to +40°С / -13°F to +104°F)
- Fully waterproof (IPX7 rated)
Video/Audio Recording
- Built-in video and sound recorder
- Integration with iOS and Android devices
- Wi-Fi remote control and viewing using a smartphone
- Storing photos and videos in Cloud when using the Stream Vision 2 App
Battery Pack
- Quick Change Li-Ion Battery Pack LPS7i
- Charging from USB Power Bank
- Quick-Charge power delivery
Power supply
Precautions
- It is not recommended to charge the battery with the USB cable and wireless charger at the same time. This will not increase the charge rate and may damage the battery.
- Use the USB Type-C cable and power adapter supplied with the device (or purchased separately) to charge the LPS 7i batteries.
- Follow the safety precautions described in its Manual when using the wireless charger.
- Do not place any foreign objects between the battery and wireless charger platform.
- Do not charge the battery immediately after bringing it from cold to warm. Wait at least 30 minutes for the battery to warm up.
- Do not leave the battery unattended while charging.
- Do not use the power adapter and wireless charger if they have been modified or damaged.
- Do not leave the battery plugged in after charging is complete.
- Do not expose the battery to high temperatures and naked flame.
- Do not use the battery as a power source for devices that do not support LPS 7i batteries.
- Do not disassemble or deform the battery.
- Do not drop or strike the battery.
- Do not submerge the battery.
- Keep the battery out of the reach of children.
Recommendations for Battery Use
- The battery should be partially charged (50 to 80 %) for long-term storage.
- Charge at an ambient temperature of 0°C to +35°C (32°F to 95°F) or the lifespan of the battery will decrease significantly.
- Using the battery at sub 0°C (<32°F) ambient temperature decreases battery capacity. This is normal and not a defect.
- Using the battery at temperatures outside the range of -25°C to +50°C (-13°F to 122°F) may reduce battery life.
- The battery is short-circuit protected. Any situation that may cause short-circuiting should be avoided.
Battery Charging
The Telos LRF thermal imager comes with an LPS7i rechargeable Lithium-ion battery. LPS7i batteries support USB Power Delivery fast charging technology when using a standard charging set (USB Type-C cable, power adapter). Before first use, make sure the battery is fully charged. LPS 7i batteries also support wireless charging.
The icon ![]() in the status bar will flash when the battery is low. The battery needs to be charged.
in the status bar will flash when the battery is low. The battery needs to be charged.
Option 1. USB Charging

- Install the LPS7i battery in the battery compartment of the device.
- Connect the USB cable (21) to the USB Type-C connector (17) of the device.
- Connect the other end of the USB cable (21) to the Power Adapter (22) by removing the USB Type-A adapter.
- Plug the Power Adapter (22) into a 100-240 V socket.
- Wait until the battery is fully charged (indication in the status bar:
 ).
).
If the device is off, the LED indicator (18) will display the battery charge status:
| LED indication | Battery charge status |
| Battery defective. Do not use the battery! | |
| Battery charge level is from 0% to 50% | |
| Battery charge level is from 51% to 75% | |
| Battery charge level is from 76% to 99% | |
| Battery is full |
Option 2. Charging the battery via USB
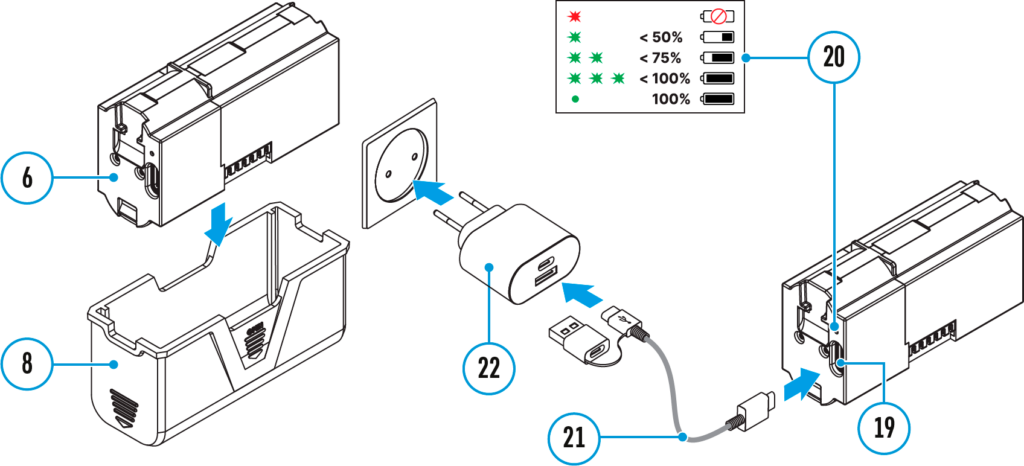
- Remove the protective cover (8).
- Connect the plug of the USB Type-C cable (21) to the USB Type-C connector (19) of the battery.
- For fast charging, connect the second end of the USB Type-C cable (21) to the Type-C connector of the power adapter (22) by removing the Type-A adapter from the plug. When connected to a computer or a Type-A power adapter, the battery will charge at normal speed.
- Plug the power adapter (22) into a 100-240 V socket.
- LED (20) will display battery charge level (see Table).
| LED indication | Battery charge status |
| Battery defective. Do not use the battery! | |
| Battery charge level is from 0% to 50% | |
| Battery charge level is from 51% to 75% | |
| Battery charge level is from 76% to 99% | |
| Battery is full |
Option 3. Wireless Charging
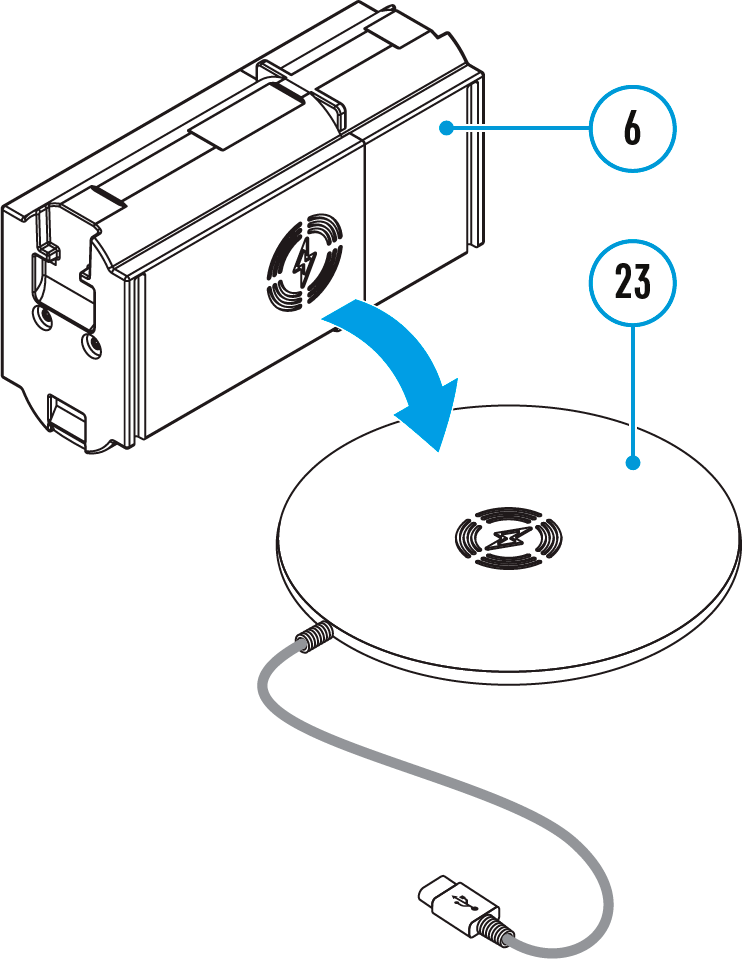
- Place the battery (6) with the sign
 side on the wireless charger* (23). For more efficient wireless charging, align the lightning bolt icon on the battery with the centre of the charger platform (23).
 - Turn on the wireless charger according to its instruction manual.
- LED (20) will display battery charge level (see Table).
* Third party-purchasing. The LPS7i battery works with all QI standard wireless chargers.
Note: Charging with a USB cable is significantly faster than using a wireless charger.
Battery Installation
1. Install the cover (7) on the LPS7i battery (6).
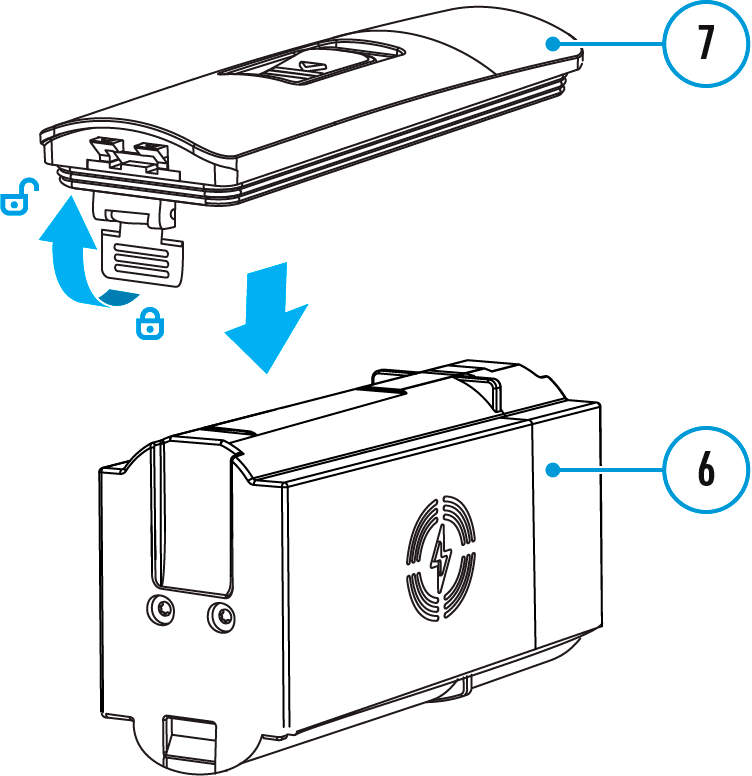
2. Insert the battery (6) into the battery compartment (5) until you hear a click. The battery contacts must face the top of the device (see diagram).
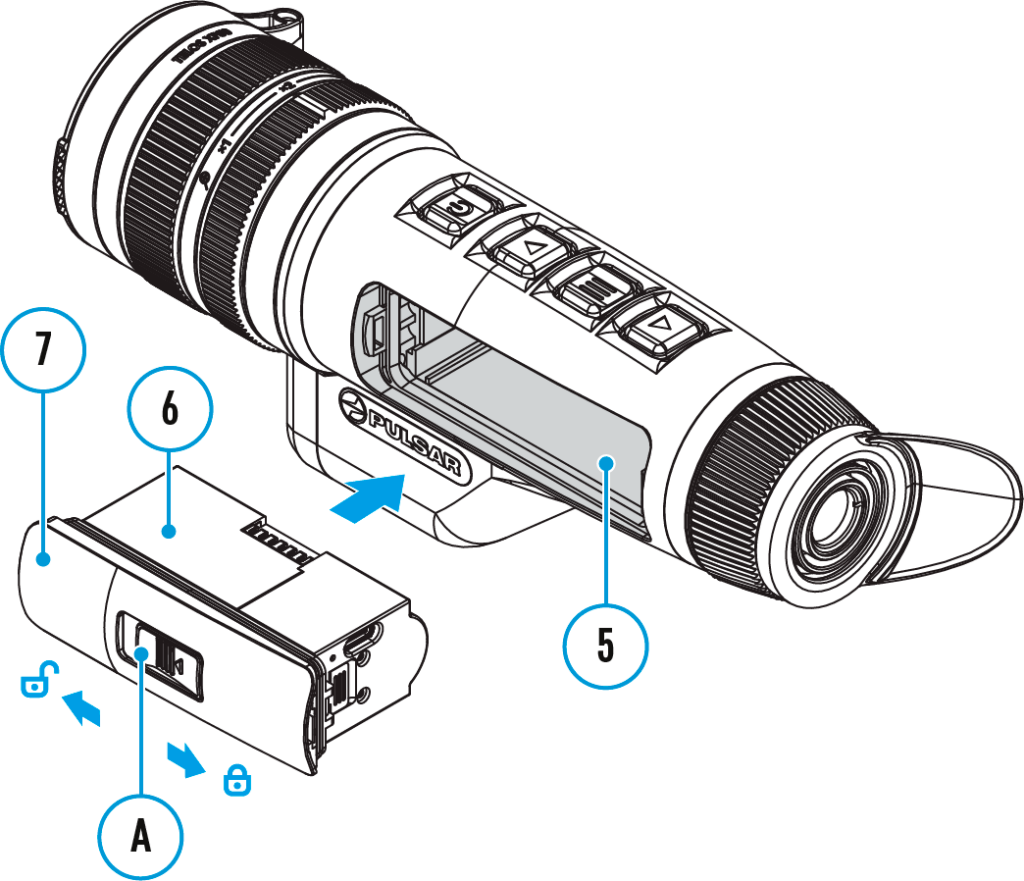
3. To remove the battery (6), slide the switch (A) on the cover (7) to the left  .
.
External Power Supply

Power can be supplied from an external source such as a 5 V or 9 V power bank.
- Connect the external power source to the USB Type-C connector (17) on the device.
- The device will switch to draw power from the external source while the LPS7i battery is gradually recharged.
- A battery icon
 will appear on the display showing the percentage-charged level.
 - An icon
 will be displayed when the device is powered by an external power source and the LPS7i battery is not connected.
 - The device automatically switches to the LPS7i battery when the external power supply is disconnected.
Attention! Charging LPS7i batteries from an external source at temperatures below 0°C (<32°F) can reduce battery life. When using external power, connect the power bank to the device only after it has been turned on and working (warming) for at least several minutes.
Getting started
Powering on and Image Settings
- Open the lens cover (1).
- Press the ON/OFF (9) button briefly to turn on the device.
- Adjust the eyepiece diopter ring (13) until the symbols in the display are sharp.
- Rotate the lens focus ring (3) to focus on the object being observed.
- To change the magnification, turn the digital zoom adjustment ring (4).
- Enter the main menu with a long press of the MENU (11) button and select the desired calibration mode: manual (M), semi-automatic (SA) or automatic (A).
- Calibrate the image by briefly pressing the ON/OFF (9) button (if the SA or M calibration mode has been selected). Close the lens cover when calibrating manually.
- Activate the quick menu by briefly pressing the MENU (11) button to adjust the brightness and contrast of the display and select the desired amplification level (“Normal”
 , “High”
  , “Ultra”
  (for more details see the Quick Menu section).
 - Activate the smoothing filter
 in the main menu to improve the image as the amplification level increases.
 - Select one of the colour palettes in the main menu (for more details see the Colour Modes section).
- Upon completion of use turn the device off by a long press of the ON/OFF (9) button.
Observation conditions: time of day, weather, type of observation objects affect the image quality. Custom settings for brightness, display contrast as well as the function of adjusting the microbolometer sensitivity amplification level will help to achieve the desired quality in a particular situation.
Warning! Never point the lens at intensive energy sources such as laser radiation emitting devices or the sun. It can damage electronic components in the device. The warranty does not cover damage arising from failure to comply with operating instructions.
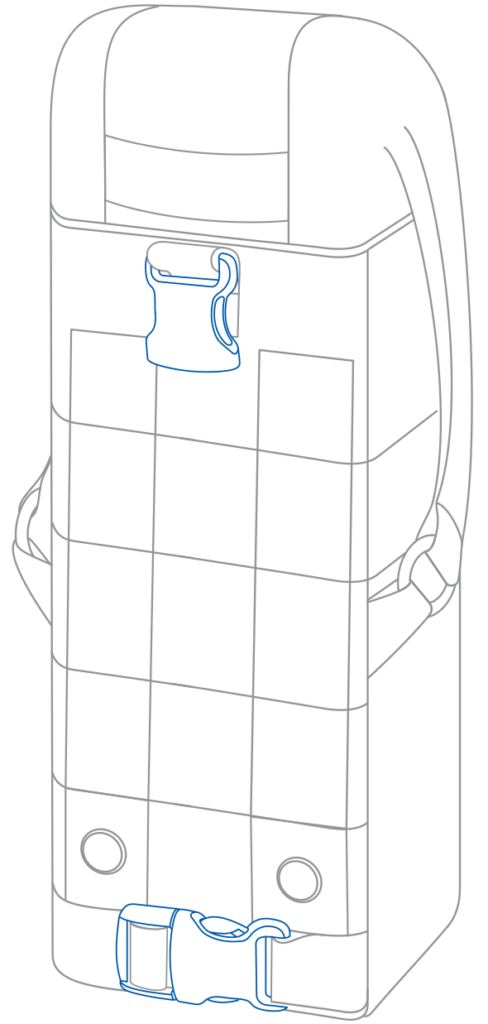
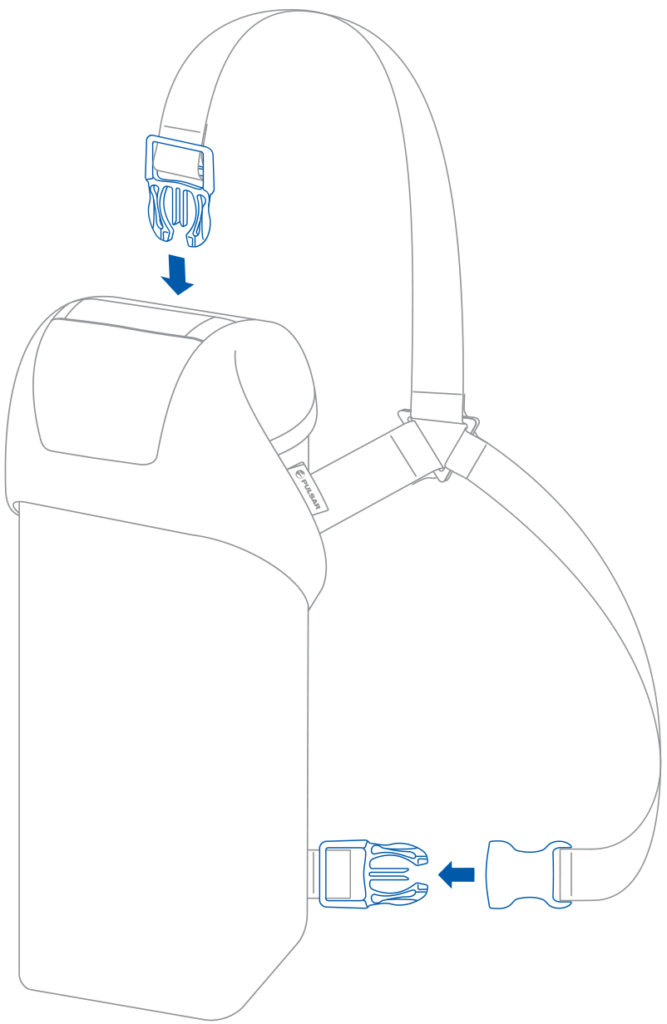
Adjusting the position of the hand strap
Installation of the 3-point strap on the carrying case
The carrying case comes with 3-point-strap for comfortable carrying of the case on the chest during intensive movement.

Button operation
| Operation | Button |
| Power device on |  short press short press |
| Power device off | long press for 3 secs |
| Turn display off | long press for less than 3 secs |
| Turn display on | short press |
| Calibrate the microbolometer | short press |
| Turn on/off the White Hot palette | long press |
| Video Recorder | Button |
| Start/pause/resume video recording |  short press short press |
| Stop video recording | long press |
| Switch to video / photo | long press |
| Capture a photo | short press |
| Laser Rangefinder | Button |
| Turn on rangefinder |  short press short press |
| Single distance measurement | short press |
| Activate rangefinder scan mode | long press |
| Deactivate rangefinder scan mode | short press |
| Turn off rangefinder | long press |
| Main Menu | Button |
| Enter main menu |  long press long press |
| Navigation upwards/rightwards | short press |
| Navigation downwards/leftwards | short press |
| Confirm selection | short press |
| Exit submenu without confirming selection | long press |
| Exit menu (switch to viewing mode) | long press |
| Quick Menu | Button |
| Enter quick menu | short press |
| Switch between quick menu options | short press |
| Increase value | short press |
| Decrease value | short press |
| Exit quick menu | long press |
Interface
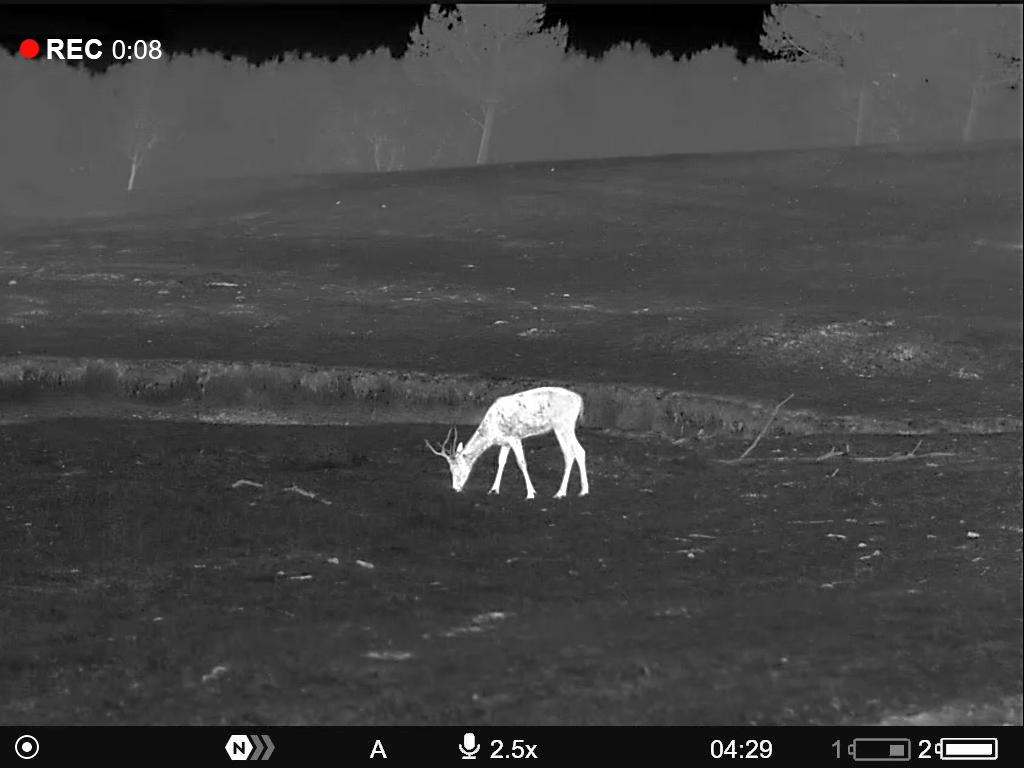
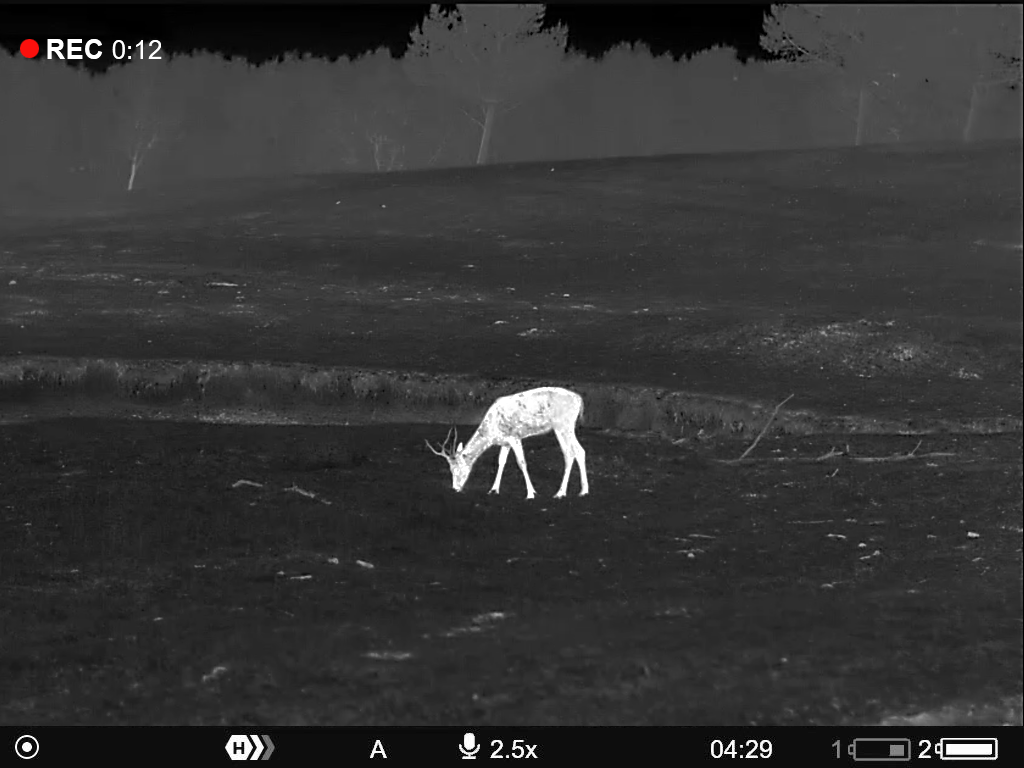
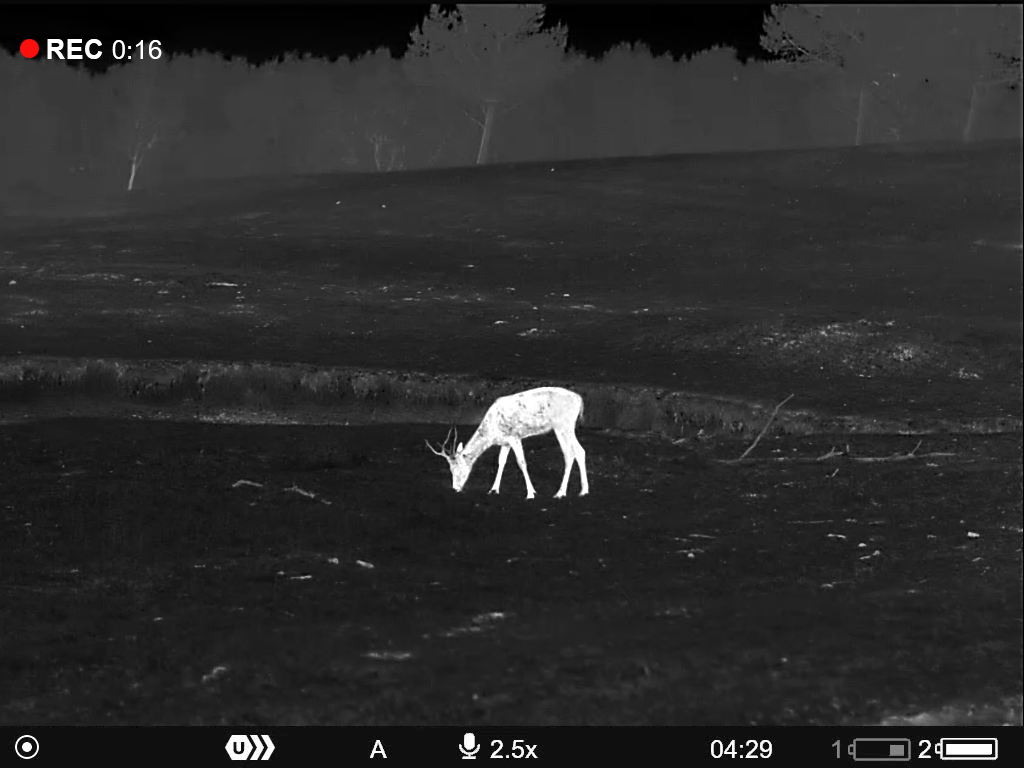
Status bar
![]()
The status bar at the bottom of the display shows current operating statuses via icons, including:
- Colour Mode:
– White hot
– Black hot
- Amplification level
- Smoothing Filter (displayed when the function is on)
- Calibration Mode (in Automatic calibration mode a countdown timer will appear instead of the calibration mode icon 3 seconds before automatic calibration begins).
- Microphone
- Magnification
- Wi-Fi Connection
- Time
- Power Indication:
– charge level if the device is powered by a battery
 – charge level if the device is charging and powered by a battery
 – no battery, the device is connected to an external power supply
Quick menu
The quick menu is used to quickly access the settings for brightness, contrast, and amplification modes.
- Enter the menu by briefly pressing the MENU (11).
- A short press of the MENU (11) button enables you to toggle between functions, as described below.

Brightness – press the UP (10)/DOWN (12) buttons to change display brightness from 0 to 20.
Contrast – press the UP (10)/DOWN (12) buttons to change image contrast from 0 to 20.
Note: display brightness and contrast settings are saved in the memory when the device is turned off.
Amplification Levels – allows you to select one of three amplifying levels of sensitivity (Normal , High , Ultra ).
Note: To maintain brightness and contrast settings when changing amplifying levels, activate User Mode.
- Press and hold the MENU (11) button to exit the menu or wait for 10 seconds to exit automatically.
Main Menu
Enter the Main Menu
- Enter the main menu with a long press of the MENU (11) button.
- Press the UP (10)/DOWN (12) buttons to move through the menu items.
- Press the MENU (11) button briefly to select the menu item.
- Press and hold the MENU (11) button to exit the menu or wait for 10 seconds to exit automatically.
- Automatic exit takes place after 10 seconds of inactivity.
Note: When entering the main menu, the background image darkens to enhance the menu visibility. This is normal and not a defect.
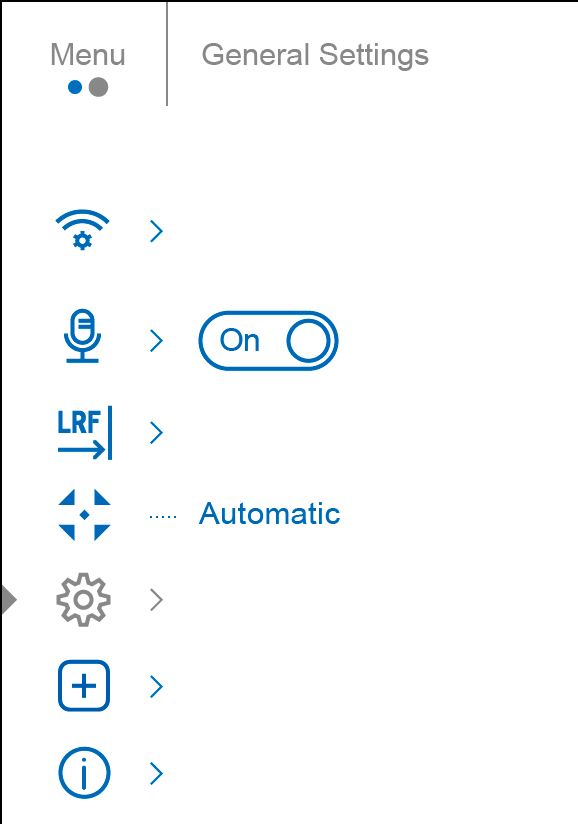
General View of Menu
Tab 1
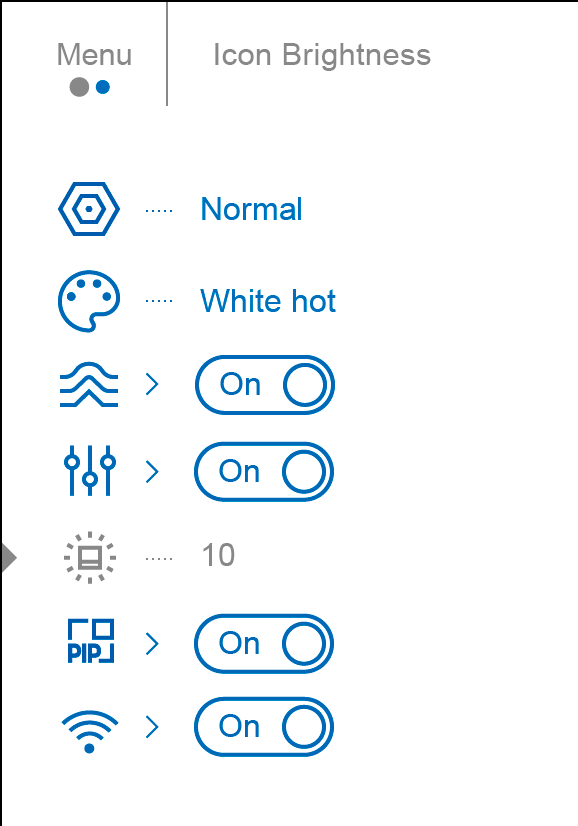
Tab 2
Amplification Level 2
The Normal , High , Ultra sensitivity enhancement features are the latest in software algorithm offerings from Pulsar that enhance the quality of detection and object recognition, regardless of observation conditions. When the temperature contrast decreases due to conditions such as fog, precipitation or high humidity, increasing the amplification level can optimize the image picture.
To reduce digital distortion, activate the Smoothing Filter in the main menu.
Normal
High
Ultra
Quick Menu:
- Enter the quick menu by briefly pressing the MENU (11) button.
- Briefly press the MENU (11) button to select the Amplification Level
 icon.
icon. - Use the UP (10)/DOWN (12) buttons to select one of three amplifying levels of sensitivity (Normal , High , Ultra ).
- Press and hold the MENU (11) button to exit the menu or wait for 10 seconds to exit automatically.
Main Menu:
- Press and hold the MENU (11) button to enter the main menu.
- Use the UP (10)/DOWN (12) buttons to select the Amplification Level icon.
- Press the MENU (11) button briefly to enter the Amplification Level submenu.
- Use the UP (10)/DOWN (12) buttons to select one of three amplifying levels of sensitivity (Normal , High , Ultra ).
- Press the MENU (11) button briefly to confirm the selection.
Amplification Level
Defective Pixel Repair
Defective Pixel Repair
![]()
When using the device, defective (dead) pixels may appear on the microbolometer. These are bright or dark points of constant brightness that are visible on the image.
Defective pixels on the microbolometer can increase in size relative to the digital-zoom power.
Telos LRF thermal monoculars allows the user to remove any defective pixels on the display, as well as cancel removal, via the device’s firmware.
![]()
Step 1. Enter the menu to fix the defective pixels
- Press and hold the MENU (11) button to enter the main menu.
- Use the UP (10)/DOWN (12) buttons to select the Defective Pixel Repair menu item.
- Press briefly the MENU (11) to open the submenu.
- Select the Defective Pixel Repair option by briefly pressing the MENU (11) button.
Step 2. Select the defective pixel
- A marker (H) appears on the left side of the display.
- On the right side of the display appears a “magnifying glass” (G) – a magnified image in the frame with a fixed cross [fixed-cross], designed for easier detection of a defective pixel and to match the pixel with the marker, and horizontal and vertical arrows for X and Y axes (I) showing the marker’s movement.
- With a short press of the UP (10)/DOWN (12) buttons move the marker to align it with a defective pixel.
- Switch the direction of the marker from horizontal to vertical and vice versa with a short press of the MENU (11) button.
- Align the defective pixel with the fixed cross in the frame – the pixel should disappear.
Step 3. Remove the defective pixel
- Delete the defective pixel with a short press of the ON/OFF (9).
- Once the pixel has been successfully deleted an “OK” message will briefly appear on the screen.
- You can then delete another defective pixel by moving the marker across the display.
- Exit the Defective Pixel Repair submenu with a long press of the MENU (11).
Warning! The display of a thermal imager may have 1- 2 pixels represented as bright white or coloured (blue, red) dots which cannot be deleted and are not a defect.
Restore Default Pixel Map
Restore Default Pixel Map content